The Moebius README contains some information to run a Moebius Server that might be slightly too technical for some of us. This post is an attempt to provider more elaborate instructions.
First of all, Moebius Server is intended to run on a machine with direct internet access, it needs a pulbic IP address. If you intend running the server on your internet connection at home you will very likely need Port Forwarding (also known as Port Mapping) to be done on your router. Your Internet Service Provider should have instructions to set up such a port forwarding. Setting this up is beyond the scope of this post, but you may find more information on how to do this on sites like portforward.com or alternatively you can use a free service like portmap.io to set it up. But you need to know that you need to map at least TCP port 8000 from your router to the machine on your network which is going to run the Moebius Server. If you want to web preview, you’ll also need TCP port 8080.
Moebius requires nodejs to run, so move over the nodejs download page and download the installer for your platform. The installation is very straightforward and you’ll be good with just accepting all defaults.
Next download Moebius. The official README suggests doing this with ‘git’, but it’s not required, you can also download the “source code (.zip)” from the release page (don’t donwload version 1.0.28 as it has a server startup bug). Extract this ZIP file on your hard drive.
Now you’ll need to execute some commands in a terminal window, on Windows this is called a “Command Prompt” on MacOS it’s “Terminal”. In this window you need to navigate to the location where you extracted the Moebius source. This is done with the ‘cd’ command, on Windows for example you’d enter the following command (assuming you’ve extracted your ZIP file in C:)
cd C:\Moebius-1.0.29
Now you need to install the package and it’s dependencies. This is fully automatic and will take a few minutes to complete, enter the following command:
npm install
You’ll get the prompt returned to you when it’s done. When this completes you have a functional Moebius client and server. The server needs a document to start with, it won’t start without but it can be empty. To create an empty document on Windows type:
type nul > server.ans
On MacOS or Linux you’d type:
touch server.ans
Now you’re ready to start the Moebius Server with it’s default settings by entering:
node ./server.js
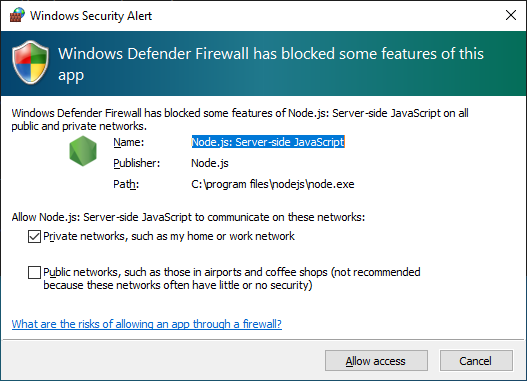
The first time you do this, your operating system might warn you about the application using network connectivity, you’ll need to alllow this. Typically on Windows this would like this:

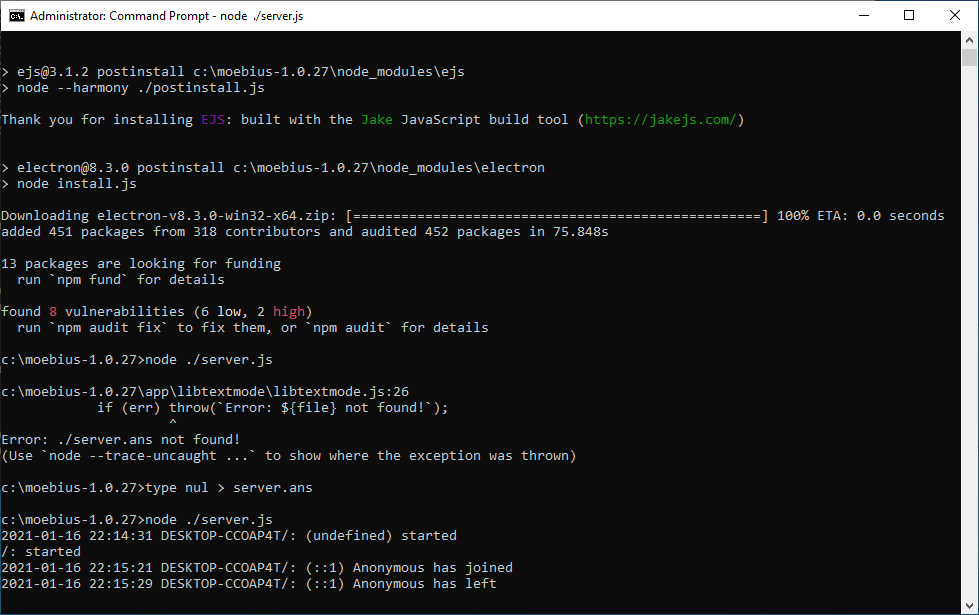
Once the server runs you’ll see “/: started” in the output, in this screen you’ll see log messages such as users connecting and chatter. You’re now ready to test connecting to you server, start Moebius on the same machine and as server name enter “localhost”, the password field may be left empty. Moebius will now connect to your local server.
When you’ve done all of the above your terminal should look like this:

To stop the server on Windows/Linux press Ctrl-C (Windows) on MacOS press Cmd-. (dot/period) Again, to be able to connect to your Moebius Server on your home connection from the internet, you need to set up Port Forwarding. (see above).
The server.js script accepts some additional parameters that allow you to modify the way it runs, the possible parameters are:
- –file=filename.ans : the initial file to load, by default: server.ans
- –passw=P4ssW0rd : set a password for this Moebius Server, by default any value is accepted.
- –web : run the web preview. this is a webpage that shows a live preview of the canvas and can be access on the same host on port 8080
- –web_port=8080 : this option changes the port of the live preview
- –quiet=true/false: suppress the output in the terminal window
- –server_port: modify the port the server listens to (defaults to 8000), mind that changing this requires explicit mention of the port in the client.
To use these parameters you should add them as a parameters to server.js, for example
node ./server.js --file=filename.ans --passw=kensentme --web --quiet=true
